There’s nothing quite like that sinking feeling on a sweltering summer afternoon when you realize the air coming from your vents isn’t cold anymore. You check the thermostat, it’s set correctly, but the house is getting warmer by the minute. Before you panic and call for an expensive emergency repair, let’s talk about one of the most common culprits: a failed AC capacitor. Learning how to replace an AC capacitor is one of the most empowering and money-saving skills a homeowner can have. It might sound intimidating, but with a major emphasis on safety and the right guidance, it’s a job you can likely tackle yourself.
Think of an AC capacitor as the little battery that gives your Air Conditioner’s motors the powerful jolt they need to get started and keep running smoothly. It provides the initial kick for the compressor and the fan motor in your outdoor unit. When it goes bad, those motors can’t start, and you’re left with a humming box that isn’t cooling anything. This guide will walk you through the entire process, from diagnosing the problem to enjoying that sweet, cold air once again.
First, What Exactly is an AC Capacitor?
An AC capacitor is a small, cylindrical component located in your outdoor condenser unit. Its job is to store and release a burst of electrical energy. Your AC has some heavy-duty motors, and getting them to spin from a dead stop requires a lot more power than just running them. The capacitor delivers that necessary “kick.”
There are two main types you might encounter:
- Start Capacitor: Provides the initial jolt to get the motor started and then disconnects from the circuit.
- Run Capacitor: Provides energy continuously to keep the motor running efficiently once it’s started.
- Dual Run Capacitor: This is the most common type in modern residential AC units. It’s a nifty two-in-one component that serves both the compressor motor and the fan motor, all packaged in a single can. It will have three terminals on top, usually labeled “HERM” (for the hermetically sealed compressor), “FAN,” and “C” (for common).
When this little part fails, your AC unit is essentially dead in the water. The fan might not spin, or the compressor won’t kick on, leaving you hot under the collar in more ways than one.
How Do I Know if My AC Capacitor is Bad?
Before you start taking things apart, you need to be reasonably sure the capacitor is the problem. A failed capacitor often leaves a few tell-tale clues.
Here are the most common symptoms of a bad AC capacitor:
- Your AC unit hums but won’t start: The motors are trying to engage but aren’t getting that crucial jolt of energy.
- The fan on the outdoor unit isn’t spinning: You might hear the compressor hum, but the blades aren’t moving. You can sometimes give the fan a gentle push with a long stick (NEVER your hand) to see if it starts spinning. If it does, that’s a classic sign of a bad capacitor.
- The AC starts but then shuts off after a few seconds: The motor is struggling to run without the capacitor’s help and overheats, tripping a safety switch.
- A clicking sound from the outdoor unit: This can be the sound of the system trying and failing to start.
- A visible bulge or leak: A dead giveaway is a capacitor that is swollen or bulging at the top. Sometimes, you might even see an oily substance leaking from it. If you see this, you’ve found your culprit.
Safety First: The Golden Rule of Electrical Work
Let’s get serious for a moment. This is the most important section of this entire guide. You are dealing with electricity that can cause serious injury or death. You absolutely must follow these safety steps without exception.
Expert Warning: Before you even think about touching your AC unit, you must completely disconnect it from all power sources. Not just at the thermostat—at the source. There is no room for error here.
- Turn it off at the Breaker: Go to your home’s main electrical panel (breaker box). Find the breaker labeled for your “AC,” “Condenser,” or “HVAC.” It’s often a double-pole breaker, which looks like two switches connected together. Flip it to the “OFF” position.
- Turn it off at the Disconnect Box: Go outside to your AC unit. Near the unit, there will be a metal box on the wall. This is the outdoor disconnect or service switch. Open it up. It will either have a pull-out handle that you literally pull out, or a switch/breaker that you need to flip to “OFF.” Do this now.
You have now created two layers of safety. Only after confirming the power is off at both locations should you proceed.
Tools and Parts You’ll Need for the Job
The good news is that you don’t need a truck full of specialized equipment. Here’s a short list of what you’ll need:
- A new capacitor: Make sure it has the exact same specifications as your old one (we’ll cover this below).
- An insulated screwdriver: For safely discharging the old capacitor and for general use.
- A nut driver or socket wrench: Usually 1/4″ or 5/16″, for removing the access panel screws.
- A multimeter that can read capacitance (microfarads/µF): This is for testing the old capacitor to confirm it’s bad.
- Needle-nose pliers: For helping to disconnect stubborn wire terminals.
- Work gloves and safety glasses: Always a good idea.
- Your phone: To take a picture of the wiring before you disconnect anything!
Your Step-by-Step Guide on How to Replace an AC Capacitor
Alright, with the power off and your tools ready, it’s time to get to work.
- Turn Off The Power (Yes, Again!): I can’t say this enough. Double-check that the breaker and the outdoor disconnect are both off.
- Access the Capacitor: Your capacitor is located inside the condenser unit’s electrical compartment. This is usually on a corner of the unit behind a removable metal panel. Use your nut driver to remove the screws holding this panel in place.
- Take a Picture! Before you touch a single wire, take a clear, well-lit picture of the capacitor and how all the wires are connected to its terminals. This photo will be your best friend during reassembly. Note which color wire goes to which terminal (“HERM,” “FAN,” “C”).
- Safely Discharge the Capacitor: Even with the power off, a capacitor can hold a dangerous electrical charge. To discharge it, take your insulated screwdriver and, holding the insulated handle, carefully touch the metal shaft across the “C” and “HERM” terminals simultaneously. Then, do the same for the “C” and “FAN” terminals. You might see a small spark or hear a pop—this is normal. It means you’ve safely discharged any stored energy.
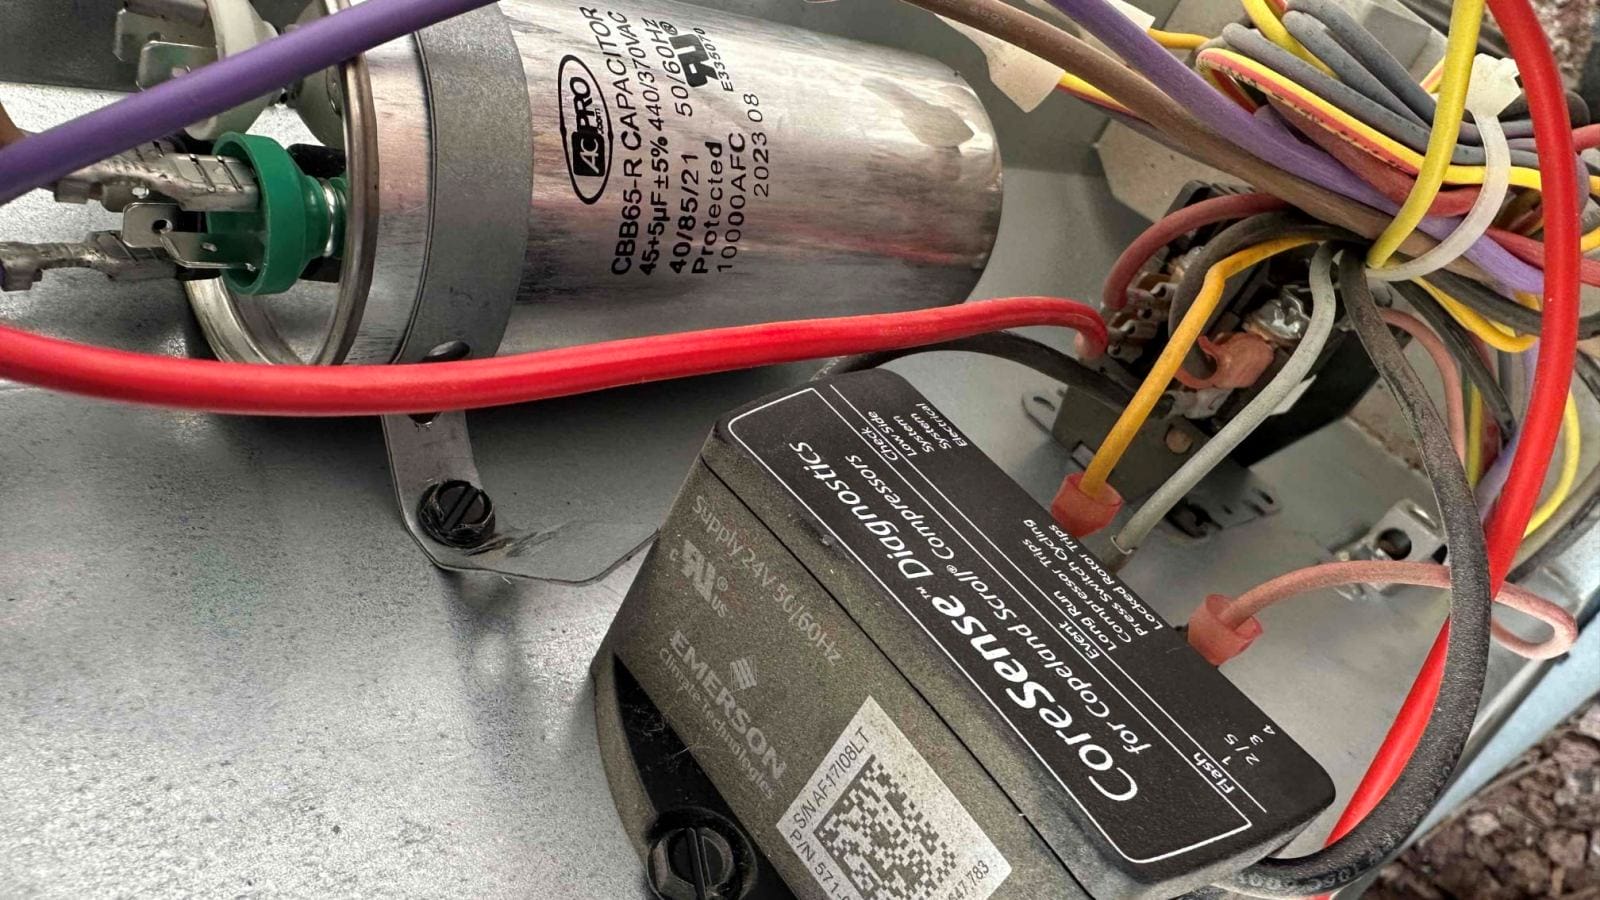
- Check the Capacitor Specs: Look at the label on the side of the old capacitor. You are looking for two key numbers:
- Voltage: This will be something like “370 VAC” or “440 VAC.”
- Capacitance: This is the microfarad (µF or MFD) rating. For a dual run capacitor, you’ll see two numbers, like “45+5 µF.” This means 45 microfarads for the compressor and 5 microfarads for the fan.
- Disconnect the Wires: Using your picture as a guide, carefully pull the wires off the capacitor terminals. If they are tight, use your needle-nose pliers to gently wiggle them off.
- Remove the Old Capacitor: The capacitor is held in place by a metal strap or bracket. Loosen the screw holding the strap and slide the old capacitor out.
- Install the New Capacitor: Slide the new capacitor into the bracket and tighten the strap so it’s secure. Make sure the new capacitor has the exact same microfarad rating as the old one.
- Reconnect the Wires: This is where your photo comes in handy. Carefully reconnect each wire to the correct terminal on the new capacitor. The terminals are clearly marked. Ensure the connections are snug.
- Put Everything Back Together: Re-attach the access panel and secure it with its screws.
- Power Up and Test: Time for the moment of truth. First, go to the outdoor disconnect box and restore power there (push the pull-out back in or flip the switch to “ON”). Then, go to your main breaker panel and flip the AC breaker back to “ON.” Finally, go to your thermostat, set it to “Cool,” and lower the temperature. Go outside and, within a minute or two, you should hear the glorious sound of your AC unit kicking on, with the fan spinning and cold air on the way.
A Pro Tip from a Veteran HVAC Tech
“I’ve been in the HVAC business for over 20 years, and the biggest mistake I see DIY-ers make is mismatching the capacitor specs,” says John Carter, a certified HVAC technician. “Always, and I mean always, match the microfarad (µF) rating exactly. For the voltage, you can safely use a capacitor with an equal or higher voltage rating—for example, replacing a 370VAC with a 440VAC is fine—but never go lower. A higher voltage rating just means the capacitor is built to handle more, making it more durable.”
What if This Doesn’t Fix My AC?
If you’ve successfully completed the how to replace an AC capacitor steps and your unit still isn’t working, the problem may lie elsewhere. It could be a faulty contactor, a wiring issue, or a more serious problem with the fan motor or compressor. At this point, you’ve done what you can, and it’s wise and safe to call a qualified HVAC professional to diagnose the issue further.
Frequently Asked Questions (FAQ)
How much does an AC capacitor cost?
An AC capacitor is a surprisingly affordable part. You can typically find a replacement online or at an appliance parts store for anywhere from $15 to $50, which is a fraction of the cost of a service call from an HVAC company.
Can I use a capacitor with a different rating?
You must match the microfarad (µF) rating exactly. Using the wrong µF rating can damage your AC motors. For voltage, you can use a capacitor with the same or a higher voltage rating, but never a lower one.
How long does an AC capacitor last?
There’s no set lifespan, but most AC capacitors last between 5 and 10 years. Factors like extreme heat, power surges, and the overall age of the AC unit can affect how long it lasts.
What’s the difference between a start and a run capacitor?
A start capacitor gives a very powerful but brief jolt to get a motor started, then switches off. A run capacitor provides a smaller, continuous amount of energy to keep the motor running efficiently. Most home AC units use a dual run capacitor that does both jobs.
Is replacing an AC capacitor dangerous?
It can be extremely dangerous if you do not follow safety procedures. The stored electrical charge can deliver a severe shock. However, if you completely cut the power at the breaker and the disconnect, and then safely discharge the capacitor, you eliminate the risk.
Conclusion
Congratulations! By learning how to replace an AC capacitor, you’ve not only saved yourself a significant amount of money but also gained valuable knowledge about how your air conditioning system works. It’s a task that proves a little bit of confidence and a strong commitment to safety can go a long way. Remember that proper maintenance is key to a long-lasting AC unit, and knowing how to handle these common repairs puts you in control of your home’s comfort.
Have you ever replaced an AC capacitor yourself? Share your experience or ask any questions in the comments below! We’d love to hear from you.