Let’s be real for a moment. It’s the peak of summer, the sun is relentless, and the last thing you want is for your trusty air conditioner to start blowing lukewarm air. Before you panic and call for an expensive repair, there’s a surprisingly simple fix that can often work wonders. Learning How To Clean Air Conditioner Coils is one of the most effective DIY maintenance tasks you can perform to restore your unit’s cooling power, improve its efficiency, and even lower your energy bills. It’s the secret weapon in every savvy homeowner’s arsenal.
Dirty coils are one of the top culprits for an underperforming AC. Think of them as the lungs of your system; if they’re clogged with dust, dirt, and grime, your AC can’t “breathe” properly. This forces it to work harder, consume more energy, and ultimately fail at its one job: keeping you cool. For those interested in preventing bigger issues, understanding the signs of a struggling AC is key. For instance, a dirty evaporator coil can sometimes contribute to a clogged drain line, which is a primary reason for water leaks. To learn more about this specific problem, understanding how to fix air conditioner leaking water provides deeper insight into your system’s health.
Why is Cleaning Your AC Coils Such a Big Deal?
So, why all the fuss about a bit of dust? Your air conditioner’s coils are fundamental to the entire cooling process. They are where the magic of heat exchange happens. When they get blanketed in a layer of grime, that process grinds to a halt.
Here’s what you gain by keeping them clean:
- Improved Cooling Performance: Clean coils transfer heat far more effectively. This translates directly to colder air blowing from your vents.
- Lower Energy Bills: When the system doesn’t have to struggle to cool your home, it uses significantly less electricity. The Department of Energy estimates that cleaning a dirty condenser coil alone can improve efficiency by up to 30%.
- Longer System Lifespan: Less strain on the compressor and other components means less wear and tear over time, helping your expensive HVAC system last longer.
- Better Indoor Air Quality: The indoor evaporator coil can become a breeding ground for mold and bacteria if left dirty. Cleaning it helps ensure the air circulating in your home is healthier. A clean system is the first step, but it’s also crucial to understand how to prevent mold in AC for a truly healthy home environment.
Getting to Know Your Coils: Evaporator vs. Condenser
Your air conditioning system has two distinct sets of coils, and they both need attention. Knowing the difference is the first step in learning how to clean air conditioner coils correctly.
The Indoor Evaporator Coil
This coil is located inside your home, usually within the indoor air handler unit (that big metal box that’s part of your furnace or in a closet). Its job is to absorb heat from your indoor air as it passes over. It’s typically damp during operation, which makes it a magnet for dust, pet dander, and other airborne particles.
The Outdoor Condenser Coil
This is the one you can see. It’s housed within the outdoor unit that sits in your yard. Its function is the opposite of the evaporator coil: it releases the collected heat from your home into the outside air. Because it’s exposed to the elements, it gets covered in dirt, leaves, grass clippings, and cottonwood fluff.
Safety First: Before You Start Cleaning
Before you grab a single tool, let’s talk safety. You’re dealing with an electrical appliance. Taking a few simple precautions is non-negotiable.
- Turn Off the Power: This is the most critical step. Find the circuit breaker for your AC unit in your home’s main electrical panel and switch it off. For the outdoor unit, there is usually a separate disconnect box mounted on the wall nearby. Turn that off as well.
- Wear Protective Gear: Safety glasses are a must to protect your eyes from dislodged debris and cleaning chemicals. A pair of gloves will protect your hands from sharp metal fins and dirt.
- Read the Cleaner’s Instructions: If you’re using a commercial coil cleaner, read and follow the manufacturer’s directions carefully, especially regarding ventilation.
How to Clean Air Conditioner Coils: The Step-by-Step Guide
Alright, with the power off and your safety gear on, you’re ready to get to work. We’ll tackle each set of coils separately.
Cleaning Your Outdoor Condenser Coils
This is usually the easier of the two jobs and often provides the most noticeable improvement.
- Clear the Area: Remove any leaves, weeds, or debris from around the outdoor unit. You should maintain at least two feet of clear space around the entire unit for proper airflow.
- Remove the Top Grille: Most units have a protective grille or fan assembly on top, held in place by a few screws. Carefully remove the screws and lift the top off. Be gentle, as the fan is often attached with wires. Set it aside carefully without straining the wiring.
- Clean Debris from the Inside: Reach inside the unit and pull out any large debris like leaves and twigs that have accumulated at the bottom.
- Spray the Coils from the Inside Out: Using a regular garden hose with a spray nozzle, gently spray the coils. Direct the water from the inside of the unit, pushing the dirt and grime outward. This prevents you from forcing the debris deeper into the delicate fins.
- Use a Coil Cleaner (If Necessary): For heavily soiled coils, you can use a commercially available condenser coil cleaner. You can find foaming cleaners at most home improvement stores. Spray it on the coils (usually from the outside), let it sit for the recommended time (typically 5-10 minutes) to break down the grime, and then rinse it off thoroughly with the hose.
- Straighten Bent Fins: The aluminum fins on the coils are extremely delicate and can bend easily. If you see any bent areas, use a fin comb (a cheap tool available online or at appliance parts stores) to gently straighten them.
- Reassemble: Once the coils are clean and the fins are straight, carefully place the top grille and fan back in place and secure the screws.
Expert Tip from HVAC Technician John Miller: “The biggest mistake I see homeowners make is using a pressure washer on their condenser coils. The high pressure will flatten the delicate aluminum fins in an instant, completely blocking airflow. A gentle spray from a garden hose is all you need.”
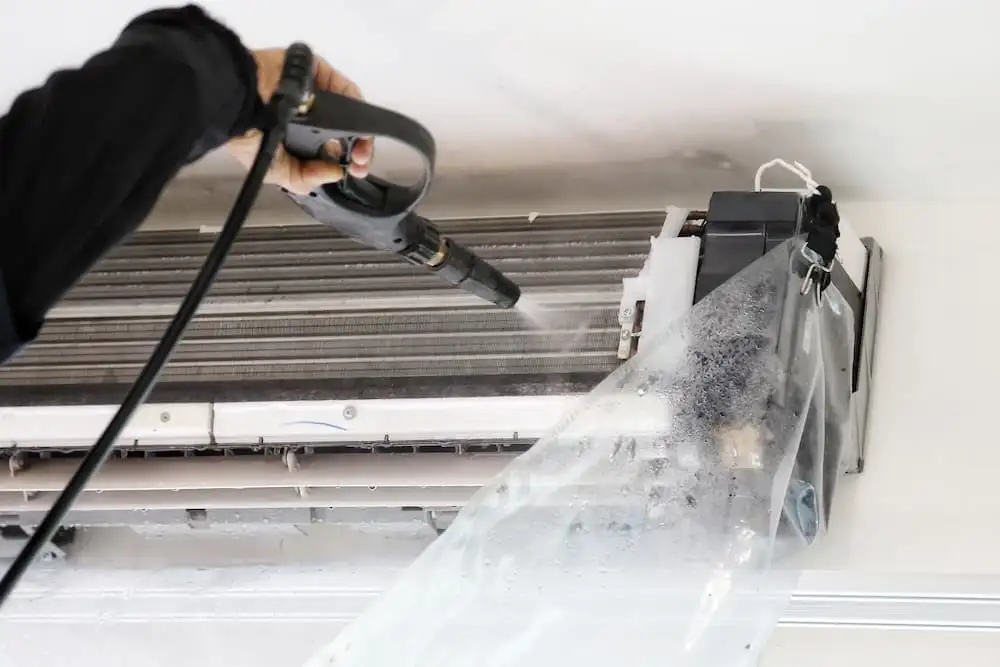
How to Clean Your Indoor Evaporator Coils
This can be a bit more challenging as the coils are often harder to access. Their location varies by system, so you may need to consult your owner’s manual.
- Access the Coil: The evaporator coil is usually located in a V-shape or A-frame configuration inside the air handler. You’ll need to remove an access panel or door, which is typically held on by screws or clips.
- Initial Dusting: Use a soft brush attachment on your vacuum cleaner to gently remove the surface layer of dust and debris from the coils. Always brush in the same direction as the fins to avoid bending them.
- Apply a No-Rinse Coil Cleaner: For evaporator coils, a no-rinse foaming cleaner is your best friend. These are specifically designed for indoor use. Spray the cleaner evenly across the coils. The foam will expand, get into the nooks and crannies, and break down the grime.
- Let it Work: As the name implies, there’s no need to rinse. The foam will liquefy and drip down into the condensate drain pan, effectively cleaning itself. This process also helps clean out the drain pan and line.
- Clean the Condensate Drain Pan: While you’re in there, check the drain pan located beneath the coils. Wipe it clean with a cloth to remove any standing water or sludge that has built up. A clean drain pan is essential for preventing water damage and mold growth.
- Reassemble: Once you’re done, replace the access panel securely.
- Restore Power and Test: Turn the power back on at the breaker box and the disconnect switch. Turn your AC on and enjoy the colder, cleaner air!
Frequently Asked Questions (FAQ)
How often should I clean my AC coils?
For most homeowners, cleaning your AC coils once a year is sufficient. A good time to do it is in the spring, right before the heavy cooling season begins. If you live in an area with a lot of dust, pollen, or cottonwood trees, you may need to do it twice a year.
Can I use a simple soap and water solution?
While it’s better than nothing, a dedicated coil cleaner is more effective. These cleaners are formulated to break down the specific types of grime that build up on coils without damaging the aluminum or copper components. Avoid acidic or bleach-based cleaners.
What happens if I don’t clean my air conditioner coils?
Neglecting your coils leads to a host of problems: reduced cooling efficiency, sky-high energy bills, increased strain on the system’s compressor (which can lead to premature failure), and poor indoor air quality.
How do I know if my coils are dirty?
Common signs include your AC running constantly but not cooling the house, a noticeable reduction in airflow from your vents, and a spike in your electricity costs during the summer. In some cases, you can visually inspect the outdoor unit and see the buildup of dirt.
Is it expensive to have a professional clean my AC coils?
A professional coil cleaning is typically part of a standard HVAC tune-up, which can range from $100 to $250. If your coils are extremely dirty or difficult to access, the cost might be higher, but it’s a worthwhile investment in your system’s health and efficiency.
The Cool Conclusion
Taking an hour or two once a year to follow this guide on how to clean Air Conditioner coils is one of the best returns on investment you can make for your home. It’s not just about maintenance; it’s about ensuring comfort on the hottest days, saving real money on your utility bills, and extending the life of one of your home’s most expensive appliances. So, roll up your sleeves, turn off the power, and give your AC the spa day it deserves. Your cooler, more comfortable future self will thank you.
2 thoughts on “How to Clean Air Conditioner Coils for Colder Air & Lower Bills”